What Is Car Subwoofer Installation
Car subwoofer installation refers to the process of adding a dedicated bass speaker (subwoofer) to your vehicle’s audio system, usually powered by an external amplifier.
A properly installed subwoofer system improves:
- low-frequency response (bass)
- overall sound clarity
- audio depth and balance
This upgrade is one of the most noticeable improvements you can make to a factory audio system.
Types of Subwoofer Systems
Active Subwoofer (Powered)
- Built-in amplifier
- Easier installation
- Ideal for beginners
Passive Subwoofer
- Requires external amplifier
- More powerful and customizable
- Preferred for performance setups
Components Required
To complete a proper car subwoofer installation, you need:
- Subwoofer
- Amplifier (for passive systems)
- Power cable (from battery)
- Ground cable
- RCA signal cables
- Remote turn-on wire
- Fuse + fuse holder
- Speaker wire
- Basic tools
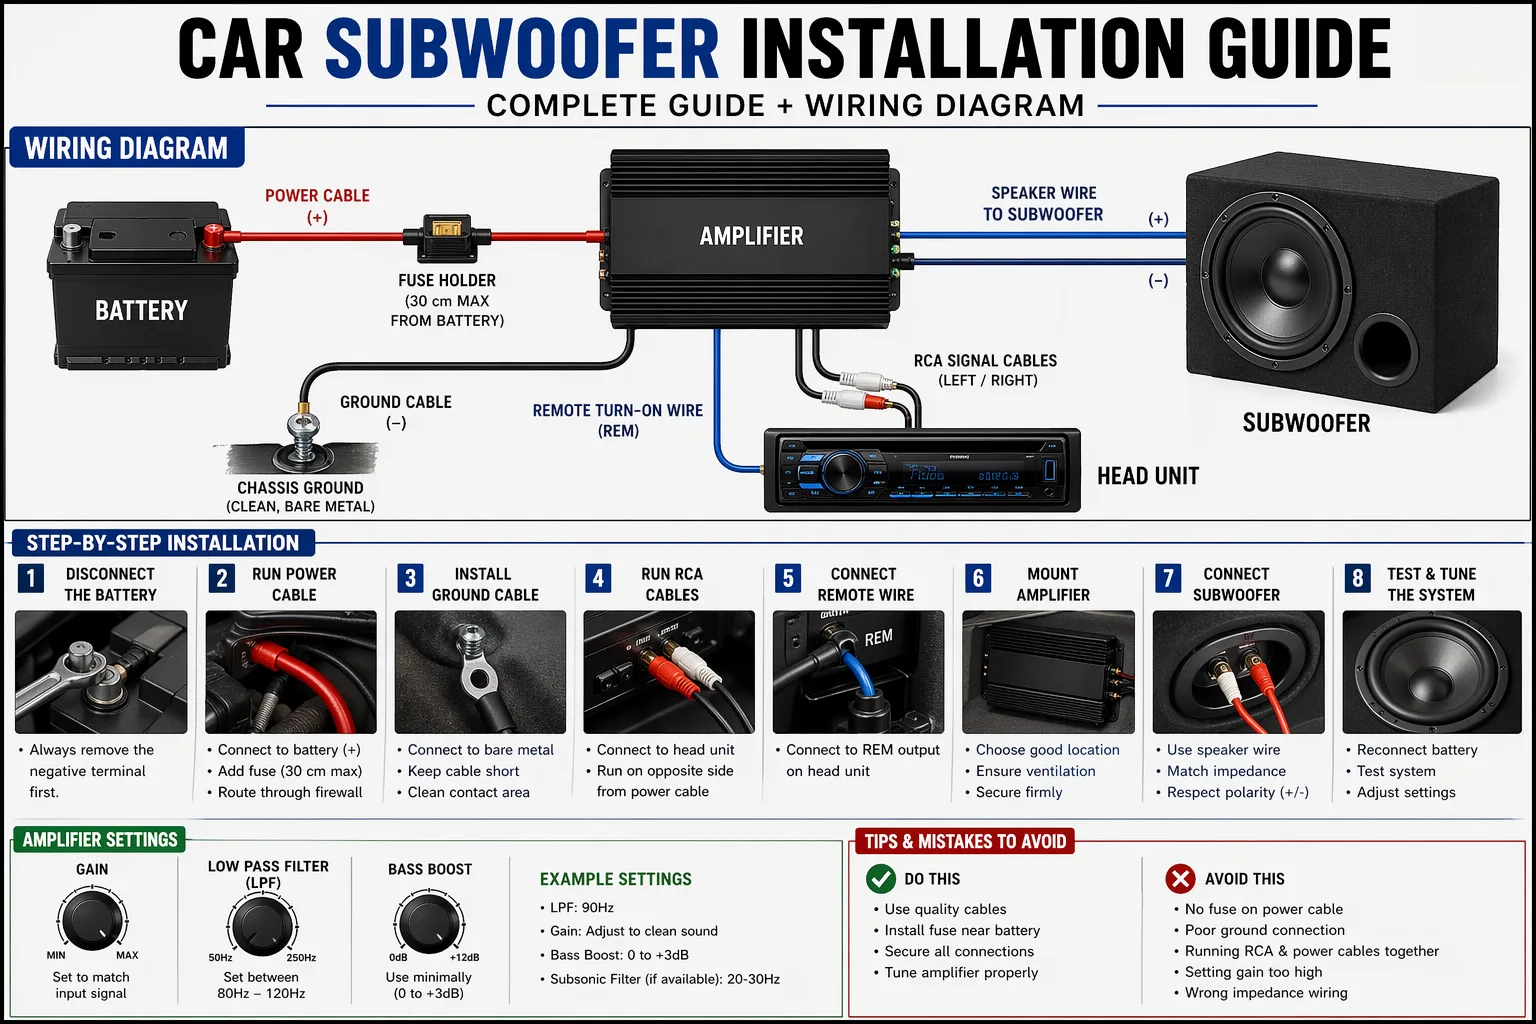
Car Subwoofer Wiring Diagram
Explanation of Wiring Diagram
The system consists of 4 essential connections:
- Power (Battery → Amplifier)
- Ground (Amplifier → Chassis)
- Short cable to bare metal
- Ensures stable operation
- Signal (Head Unit → Amplifier)
- RCA cables carry audio signal
- Remote Turn-On
- Tells amplifier when to power on
- Speaker Output (Amplifier → Subwoofer)
- Sends amplified signal to subwoofer
Step-by-Step Car Subwoofer Installation
Step 1 – Disconnect the Battery
Always disconnect the negative terminal before starting.
Step 2 – Run Power Cable
Step 3 – Install Ground Cable
- Attach to bare chassis metal
- Keep cable short
- Clean surface for best contact
Step 4 – Route RCA Cables
- Connect from head unit to amplifier
- Run on opposite side from power cable
This avoids electrical noise (alternator whine).
Step 5 – Connect Remote Wire
- Connect to REM output on head unit
- Required for amplifier startup
Step 6 – Mount the Amplifier
Best locations:
- trunk
- under seat
Ensure:
- airflow
- solid mounting
Step 7 – Connect Subwoofer
- Use proper gauge speaker wire
- Match impedance (ohms)
- Respect polarity (+ / -)
Step 8 – Reconnect Battery and Test
Check:
- amplifier powers on
- subwoofer produces sound
- no distortion or noise
Amplifier Settings (Very Important)
Proper tuning prevents damage and improves sound.
- Gain → match input signal (not volume)
- Low Pass Filter (LPF) → 80–120 Hz
- Bass Boost → use minimally
Common Installation Mistakes
- No fuse on power cable
- Poor ground connection
- Running RCA and power cables together
- Gain set too high
- Incorrect subwoofer wiring
Pro Tips for Better Bass
- Use quality wiring kits
- Secure all connections tightly
- Place subwoofer facing rear for better bass reflection
- Avoid cheap amplifiers
How Long Does Installation Take
- Beginner: 2–4 hours
- Experienced: 1–2 hours
Conclusion
A correct car subwoofer installation transforms your audio system completely. By following the wiring diagram and installation steps above, you can achieve clean, powerful, distortion-free bass.
FAQ – Car Subwoofer Installation
Can I install a subwoofer without an amplifier?
Only if it is an active subwoofer (built-in amp).
What size fuse should I use?
Depends on amplifier power, but typically 40A–100A.
Why is my subwoofer weak?
Common causes:
- incorrect gain
- poor ground
- wrong wiring

✍️ Author: Bejenaru Alexandru Ionut – [email protected]
🔗 Internal link: https://diagnozabam.ro/sfaturi
A highly stable and intuitive tablet for DIY enthusiasts and small garages, focused on complete fault code scanning across all modules:

Want to scan all modules using a classic, rugged handheld layout without worrying about Android setups and configurations?