
What Is an EVAP Canister and Why It Matters: An Engineering Guide to Evaporative Emission Control Systems and Diagnostic Tooling
Introduction: The Hidden Guardian of Fuel Vapor Containment
To the casual driver, the operation of a modern internal combustion engine seems entirely localized to what happens inside the combustion chambers and along the exhaust plumbing. However, automotive engineering requires a holistic approach to managing all chemical components within a vehicle—including the raw fuel resting inside the storage tank. Gasoline is an exceptionally volatile liquid petroleum product; it naturally vaporizes at relatively low ambient temperatures, creating high-pressure hydrocarbon gases inside the sealed fuel tank environment.
Historically, before environmental protection regulations became mandatory, vehicle fuel systems simply vented these raw hydrocarbon vapors directly into the surrounding atmosphere through unsealed, breathing gas caps.
Today, this primitive approach is strictly illegal worldwide due to the severe environmental damage caused by raw hydrocarbons, which contribute heavily to photochemical smog and atmospheric ozone degradation.
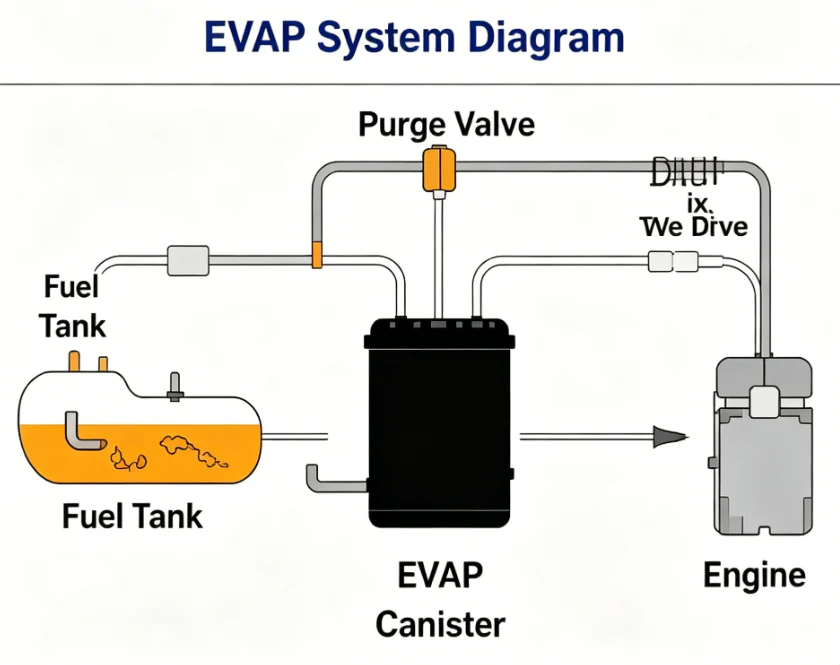
Enter the Evaporative Emission Control (EVAP) system, a highly engineered closed-loop network designed to capture, isolate, and recycle these volatile organic compounds. At the absolute center of this environmental defense architecture sits the EVAP Canister—also widely referred to as the charcoal canister or vapor canister. Understanding how this specialized component functions, identifying its failure modes, and learning how to leverage advanced hardware diagnostics is essential for maintaining vehicle performance, preserving fuel economy, and ensuring compliance with modern emissions standards.
The Physics of Adsorption: How the EVAP Canister Traps Vapor
To understand why the EVAP canister is so vital, one must look at the chemical engineering principle of adsorption (not to be confused with absorption). Absorption occurs when a substance enters completely inside a liquid or solid bulk material (like water soaking into a sponge). Adsorption, however, is a surface-based phenomenon where gas atoms or molecules adhere explicitly to the outer surface of a solid substrate due to intermolecular forces.
                    [ Volatile Raw Hydrocarbon Vapors ]
                                     │
                                     ▼ (Thermal Expansion Lift)
                                     │
                    [ EVAP Canister Charcoal Bed Core ]
                    • Millions of Microscopic Interlinked Pores
                    • High Surface-Area-to-Mass Matrix Traps Gas
                                     │
       ┌─────────────────────────────┴─────────────────────────────┐
       ▼                                                           ▼
 [ Diurnal Storage Phase ]                                  [ Engine Purge Phase ]
 • Engine Off / Solenoid Sealed                             • Intake Vacuum Opens Purge Valve
 • Vapor Latched onto Carbon Surface                        • Fresh Air Strips Hydrocarbons to Engine
The EVAP canister is packed full of highly porous granules of activated charcoal. This carbon substrate is treated via high-temperature oxidation to create millions of microscopic, interlinked pores across its structure. This micro-porosity yields an unbelievable surface-area-to-mass ratio; a single gram of highly active automotive carbon can possess an internal surface area exceeding 1,000 to 1,500 square meters.
The Storage and Clearance Cycle
When a vehicle sits parked under hot ambient conditions, the fuel inside the tank expands thermally, releasing vaporized hydrocarbons. These vapors travel along a dedicated vapor line directly into the EVAP canister inlet port. As the gas flows through the activated carbon bed, the hydrocarbon molecules chemically latch onto the massive carbon surface area, allowing clean, scrubbed air to pass through a vent valve and out into the atmosphere.
Once the driver starts the engine and transitions onto the highway, the Engine Control Module (ECM) commands a strategy known as the purge cycle. The ECM energizes the canister purge valve located in the engine bay, exposing the sealed charcoal bed to the intense vacuum generated by the engine’s intake manifold. Simultaneously, the canister vent valve opens to allow fresh atmospheric air to enter the bottom of the canister.
This incoming fresh air rushes through the carbon granules, dropping the internal partial pressure and stripping the trapped hydrocarbon molecules off the carbon surface. This newly enriched air-fuel mixture is then routed safely into the intake manifold, where it undergoes clean thermal combustion inside the engine cylinders, completely recycling the stored fuel energy without polluting the environment.
Anatomy of a Failure: Identifying Common EVAP Fault Symptoms
Because the EVAP system operates quietly behind the scenes without a direct mechanical link to the wheels, drivers often ignore it until a severe component failure occurs. However, a compromised or clogged charcoal canister introduces several distinct operational issues that directly impact daily drivability and refueling logistics:
                          [ Failed EVAP Canister Matrix ]
                                         │
       ┌─────────────────────────────────┼─────────────────────────────────┐
       ▼                                 ▼                                 ▼
 [ Refueling Fuel Nozzle Clicks ]  [ Raw Gas Odor In Cabin ]        [ Rough Idling & Misfires ]
 • Vent Port Trapped / Blocked     • Cracked Outer Casing Shell     • Unmetered Fuel Vapor Leakage
 • Air Displacement Blocked        • Charcoal Saturation Overload   • Distorted Air-Fuel Ratio
1. Difficult Refueling Dynamics and Gas Nozzle Clicking
One of the most immediate, frustrating symptoms of a clogged or structurally failed EVAP canister is the constant premature shutting off of the fuel station gas pump nozzle during refueling. When you pump fresh liquid gasoline into your vehicle’s filler neck, it rapidly displaces the large volume of air and vapor resting inside the empty tank.
Under normal operating conditions, this displaced air is forced through the EVAP canister vent port. However, if the carbon granules inside the canister have collapsed, melted, or become tightly packed with fine road dust, the air cannot escape fast enough. This creates a rapid back-pressure wave up the filler neck, triggering the automatic shut-off mechanism on the gas pump nozzle and turning a simple three-minute refueling stop into an agonizingly slow chore.
2. A Pervasive, Raw Gasoline Odor
If the structural plastic outer shell of the charcoal canister develops a stress crack due to road debris impact, or if the internal carbon bed becomes completely saturated with liquid fuel due to over-filling, raw gasoline odors will begin escaping into the surrounding environment. This distinct, heavy fuel smell is usually most noticeable around the rear wheel arches of the vehicle or inside an enclosed residential garage after parking a warm vehicle.
3. Illumination of the Check Engine Light (OBD-II Leak Codes)
The onboard diagnostic framework monitored by the engine computer is highly sensitive to the integrity of the vapor sealing system. The ECM periodically runs an autonomous vacuum self-test on the fuel system layout. If it detects a pressure drop or unexpected vapor flow variations, it immediately triggers the Check Engine Light. Common trouble codes include:
-
P0440: General Evaporative Emission Control System Malfunction.
-
P0442: EVAP System Leak Detected (Small, fine vacuum leak profile).
-
P0455: EVAP System Leak Detected (Gross, major system leak or missing gas cap).
-
P0441: Incorrect Evaporative Emission Control System Purge Flow.
The Professional THINKCAR Diagnostic Matrix: No More Generic Guesswork
Let’s be completely honest here: trying to chase down an EVAP system fault on a vehicle with a generic, $20 pocket OBD2 code reader is a complete waste of your shop hours. The evaporative network doesn’t just output static parameters; it relies on highly precise, low-pressure seals and pulse-width modulated (PWM) solenoids that shift constantly based on calculated engine load. If you want to stop guessing, pinpoint the leak, and actually cycle the valves to see where the system is failing, you need proper, professional diagnostic hardware running in your bay.
This is exactly where an advanced bidirectional scanner like the THINKCAR THINKSCAN 689BT completely changes the game. You don’t need clunky, single-make dealer equipment to fix a stubborn EVAP code.
                  [ The Ultimate THINKCAR EVAP Diagnostic Arsenal ]
                                         │
       ┌─────────────────────────────────┼─────────────────────────────────┐
       ▼                                 ▼                                 ▼
 [ THINKCAR THINKSCAN 689BT ]     [ Low-Pressure Smoke Rig ]
 • Bidirectional Actuator Control       • 0.5 PSI Safe Vapor Injection
 • Live Data Graphing / Android Tablet  • Spots Microscopic Line Cracks
1. Component Actuation with THINKCAR: Forcing the System to Speak
When a car drops an EVAP code on your dash, you don’t start unbolting lines blindly. You plug in your THINKCAR THINKSCAN 689BT (pre-loaded with broad multi-make vehicle coverage) tablet. Because these are true bidirectional diagnostic tools, they don’t just read codes—they talk back to the car’s computer.
-
Toggling the Valves: You navigate straight into the Active Test or Output Test sub-menu, select the Fuel Tank Vent Valve (Purge Valve) or the Vent Solenoid, and command it to open and close manually. Standing over the engine bay, you can listen for that sharp, distinct mechanical clicking sound. If the component stays completely silent while your THINKCAR screen says it’s energized, you’ve instantly found a dead internal solenoid coil or a seized valve shaft without wasting time swapping parts.
-
Live Sensor Tracking: Instead of waiting days for a Check Engine Light to return, you can use the THINKCAR interface to view the live voltage line of the Fuel Tank Pressure (FTP) sensor to ensure it adapts instantly when the purge duty cycle shifts.
2. Intrusive Leak Testing: Unleashing the THINKCAR Service Bay Routine
When dealing with stubborn, intermittent emissions codes, you need a tool that can force the vehicle to run its own internal checks on command. Using a tablet like the THINKCAR THINKSCAN 689BT , you can command the Engine Control Module (ECM) to execute the specialized EVAP Service Bay Leak Test.
Once you trigger this script through the THINKCAR THINKSCAN 689BT touchscreen at a hot idle, the tablet instructs the car to forcefully seal the rear canister vent valve while pulsing the front purge valve wide open. This pulls a deep, heavy vacuum directly on the gas tank. The THINKCAR THINKSCAN 689BT scanner then monitors the internal vacuum decay rate across an unyielding 300-second countdown timer. If the pressure spikes during those 5 minutes, the software flags a micro-leak, helping you catch structural drop-offs before the car ever leaves your bay ramp.
3. The Professional Low-Pressure Smoke Machine: Visualizing the Invisible
Let’s say your THINKCAR THINKSCAN 689BT scanner drops a P0442 (Small Leak Detected) or a P0455 (Gross Leak Detected) trouble code. The electronics have done their job by flagging the issue, but they can’t show you a hairline crack in a plastic line tucked above the fuel tank. This is where you couple your THINKCAR THINKSCAN 689BT bidirectional commands with a dedicated automotive low-pressure smoke machine.
 [ THINKCAR THINKSCAN 689BT Command: Close Vent Solenoid ] ──► Seals the Vapor Network Tight
                                                   │
                                                   ▼
 [ Inject Smoke Tester: < 0.5 PSI Pressure ] ──► Plugs the Entire Line Matrix
                                                   │
                                                   ▼
 [ Visual Trace Escape Inspection ]           ──► Bright White Smoke Out of Micro-Cracks
You absolutely cannot hook up a regular shop air compressor to this system; anything over a few pounds of pressure will instantly balloon the fuel tank and rupture the internal components of your charcoal canister.
The dedicated smoke rig vaporizes mineral oil into a thick, bright white smoke under an ultra-safe, tightly regulated low pressure—strictly below 0.5 PSI (or 14 inches of water column).
By using your THINKCAR THINKSCAN 689BT to command the vent solenoid shut, you seal the exhaust side of the loop. You then inject the dense smoke directly into the EVAP canister’s service access line. Grab an inspection flashlight, trace along the nylon lines over the tank, check around the rusted metal mounting brackets of the canister shell, or inspect the rubber filler neck seal. Where you see a steady plume of white smoke escaping into the shop air, that is precisely where your leak is living. No more guessing, no more throwing random parts at the car.
Patinare cutie automata – Cauze, simptome si solutii complete
Step-by-Step Repair and Component Replacement Framework
If your diagnostic routine with your THINKCAR THINKSCAN 689BT tool and a smoke machine confirms that the internal charcoal bed is contaminated with liquid fuel, or if the outer plastic housing shell is structurally cracked, cleaning is no longer a viable option. Complete component replacement is mandatory to restore vehicle efficiency and pass state emissions inspections.
 [ Step 1: Structural Isolations ] ──► Vehicle De-energized / Safe Well-Ventilated Lifting Bay
                 │
                 ▼
 [ Step 2: Line Disconnection ]    ──► Quick-Release Vapor Couplers Unlatched & Labeled
                 │
                 ▼
 [ Step 3: Chassis Unbolting ]     ──► Corroded Bracket Fasteners Sprayed & Unbolted
                 │
                 ▼
 [ Step 4: Component Swap-Over ]   ──► Sensors Transferred to New Shell / Reassembled to Torque Specs
Step 1: Structural Preparation and Safety Protocol
Because you are directly opening a sealed fuel containment system containing explosive gasoline vapors, safety protocols must be rigorously followed. Ensure the vehicle’s ignition is completely turned off and the keys are removed from the proximity radius. Work inside a highly ventilated space away from open flames, pilot lights, or sparks. Elevate the vehicle safely using heavy-duty jack stands or a shop lift to gain clear access to the undercarriage near the rear axle assembly.
Step 2: Disconnection of Vapor Lines and Electrical Harnesses
Locate the EVAP canister assembly, which is typically mounted tucked above the rear differential assembly, adjacent to the main fuel tank, or behind an underbody plastic splash shield. Use a penetrating spray lubricant to clear road grit from the quick-connect vapor line couplers.
Carefully compress the plastic retaining tabs on the vapor hoses to unlatch them from the canister ports. Label each hose clearly to prevent reversing the Purge and Vent lines during reassembly. Unplug the electrical wiring harnesses from the integrated vent solenoid and pressure sensors.
Step 3: Unbolting the Support Bracket Assembly
Undercarriage mounting hardware is frequently exposed to water, road salt, and debris, often causing severe surface rust on the fasteners. Thoroughly coat the mounting bracket bolts with a high-quality penetrating oil and allow it to sit for several minutes. Using a socket wrench, carefully loosen and remove the mounting bolts holding the canister support cage to the structural vehicle chassis. Carefully lower the failed canister assembly from the vehicle.
Step 4: Component Swap-Over and Final Torque Verification
Place the old and new canisters side by side on a clean workbench. Inspect the replacement unit to ensure all port orientations match perfectly. If your replacement kit does not include a new vent valve or FTP sensor, carefully unlatch these components from the old shell, replace their rubber O-ring seals with fresh, lubricated matching rings, and install them into the new canister ports.
Mount the new assembly back onto the chassis bracket, torque the mounting fasteners to factory specifications, click the quick-connect vapor lines firmly into place until they audibly snap lock, and reconnect all electrical plugs. Clear all historic OBD-II trouble codes with your scanner, and complete a short driving cycle to allow the engine computer to reset its emissions readiness monitors.
Motor 1.6 TDI CAYC: Fiabilitate, Consum și Probleme Frecvente
Technical Specifications: System Parameters & Cost Analysis
Maintaining or replacing an EVAP canister involves clear financial and physical operational metrics that vary significantly depending on vehicle classification:
| Technical & Diagnostic Parameters | Compact / Economy Passenger Car | Premium Luxury / Heavy Duty Truck |
| Typical Component Location | Underhood Bay / Adjacent to Fuel Tank | Tucked High Above Rear Differential / Frame Rail |
| Average Replacement Part Cost | $120 to $250 USD | $300 to $600+ USD |
| Average Shop Labor Duration | 45 Minutes to 1.5 Hours | 1.0 to 2.5 Hours (Due to tight clearance access) |
| Estimated Total Repair Cost | $220 to $450 USD Complete | $500 to $850+ USD Complete |
| Primary Internal Filtration Material | Standard Grade Granular Carbon Bed | High-Density Pelleted Extruded Active Carbon |
| Solenoid Resistance Specifications | Appx. 15 to 30 Ohms Resistance | Appx. 12 to 26 Ohms Resistance |
| Common Leak Diagnostic Limits | System Vacuum Decay Over 5 Minutes | Intrusive ECM Automated Pressure Pulse Monitoring |
| Main System Contamination Cause | Normal Age Degradation / Dust Ingestion | Liquid Fuel Ingestion from Fuel Tank Topping-Off |
Conclusion: Proactive Maintenance and Long-Term Drivability
The EVAP Canister is a vital, highly active component that plays a crucial role in automotive efficiency, emissions compliance, and engine performance. It effectively bridges the gap between raw petroleum storage and clean, modern engine operation.
Ignoring the warning signs of a failing canister—such as persistent fuel smells, hard starting conditions, or recurring pump nozzle click-offs at the filling station—does far more than trigger an annoying dashboard warning light. Over extended periods, a failed emission containment system can alter engine fuel trims, cause catalytic converter stress due to unmetered vapor leakage, and pollute the environment with raw, ozone-depleting greenhouse gases.
By performing regular visual inspections of underbody vapor lines, checking gas cap seals, and using specialized bidirectional diagnostic tools like the THINKCAR THINKSCAN 689BT paired with a low-pressure smoke machine for routine checkups, you can easily catch small vacuum leaks before they develop into expensive repairs.
Most importantly, drivers can practice excellent preventive maintenance simply by breaking the bad habit of “topping off” the gas tank after the pump nozzle clicks off during refueling. By allowing the fuel system to maintain its designated air gap, you protect the active carbon filtration bed from liquid saturation, ensuring your vehicle’s emission systems remain clean, efficient, and fully functional for years to worst-case highway miles ahead.
✍️ Author: Bejenaru Alexandru Ionut – [email protected]
🔗 Internal link: https://diagnozabam.ro/sfaturi

Recommendation: Looking for a professional bi-directional diagnostic tool with full system coverage? Use code DIAGNOZABAM for 10% off.
Transparency note: Affiliate link. Purchasing through it costs you nothing extra. View Thinkcar Deal →
